The SSD1306 OLEDs are monochrom graphics displays using the I2C-interface. Displays with 128x64 and 128x32 pixels are supported. Additionally two-color display exists, but I haven’t tested these.
To use the SSD1306, import the library ssd1306
import ssd1306Open()
Open(interface)
Open(interface, address)
Open(interface, address, nx)
Open(interface, address, nx, ny)Open the SSD1306 on interface interface with I2C address
address and number of pixels nx,
ny. Only OLEDs with 128x64 or 128x32 pixels are
supported.
interface
"/dev/i2c-1"address
0x3Cnx
128ny
64Example:
Open("/dev/i2c-1", 0x3C, 128, 32)Close()Close the SSD1306 OLED device.
Display()Display the current buffer. If you perform a drawing command, only
the buffer will be changed. The display will not show the changes until
Display() is called.
Cls()
Cls(color)
Clear the screen using color color. If color is omitted,
the current background color is used.
color
Pset(x1, y1)
Pset(x1, y1, color)
Draw a pixel at point (x1, y1) with color
color
x1, y1
color
Line(x1, y1, x2, y2)
Line(x1, y1, x2, y2, color)
id
x1, y1
x2, y2
color
Rect(x1, y1, x2, y2)
Rect(x1, y1, x2, y2, color)
Rect(x1, y1, x2, y2, color, fill)
Draw a rectangle with the top left corner at point
(x1, y1) and bottom right corner at (x2, y2)
with line color color. If fill is 1 (true), a
filled rectangle will be drawn.
x1, y1
x2, y2
color
fill
Roundrect(x1, y1, x2, y2)
Roundrect(x1, y1, x2, y2, radius)
Roundrect(x1, y1, x2, y2, radius, color)
Roundrect(x1, y1, x2, y2, radius, color, fill)
Draw a rectangle with the top left corner at point
(x1, y1) and bottom right corner at (x2, y2)
with line color color and rounded corners. The radius in
pixel of the corners if given by radius. If
fill is 1 (true), a filled rectangle will be drawn.
x1, y1
x2, y2
radius
color
fill
Circle(x, y, radius)
Circle(x, y, radius, color)
Circle(x, y, radius, color, fill)
Draw a circle at position (x, y) with radius
radius in pixel. color defines the line color.
If fill is set to 1 (true), then
the circle is filled with color. If no color is given, the
current foreground color will be used.
x
y
radius
color
fill
Triangle(x1, y1, x2, y2, x3, y3)
Triangle(x1, y1, x2, y2, x3, y3, color)
Triangle(x1, y1, x2, y2, x3, y3, color, fill)
Draw a triangle with the corner points (x1, y1),
(x2, y2) and (x3, y3) with line color
color. If fill is 1 (true), a filled triangle
will be drawn.
x1, y1, x2, y2, x3, y3
color
fill
Print(text)
Print(text, color)
Print text text with text color color.
After printing the text, the text cursor advances by one text-line. The
following special characters are supported:
| Character | Description |
|---|---|
\a |
Set cursor position to upper left (0, 0) |
\b |
Move cursor back by one position |
\n |
Go to start of current line |
\r |
Go to line below |
text
color
At()
At( x)
At(x, y)
Set the text cursor to the pixel (x, y).
x
0y
0SetTextSize(size)Set text size to size. size must be an
multiple of 8.
size
SetArray(A)
SetArray(A, x)
SetArray(A, x, y)
SetArray(A, x, y, trans)
Copy the content of the 2D-array A to screen at position
(x,y) using transparency mode trans. The
following transparency modes are supported:
| Mode | Description |
|---|---|
| 0 | no transparency |
| 1 | Every element of A with value
0 will be transparent |
A
x and y
trans
A = GetArray()
A = GetArray(x)
A = GetArray(x, y)
A = GetArray(x, y, w)
A = GetArray(x, y, w, h)
Copy the screen context inside the rectangle with top-left corner at
(x, y), a width of w and a height of
h to the 2D-array A.
A
x and y
w
h
SetBrightness()
SetBrightness(b)
Set brightness of the display from 0 to 255. 0 is dark, 255 bright.
b
InvertDisplay()Invert display: Black to white and white to black.
DisplayOn()Turn display on.
DisplayOff()Turn display off.
For running this example, you need a SSD1306 compatible OLED display. OLEDs with 128x64 or 128x32 pixels are supported. SmallBASIC PiGPIO 2 is using the I2C-protocol for communication. The Raspberry Pi support this protocol in hardware, but by default the protocol is disabled. Therefore you have to setup I2C as described here.
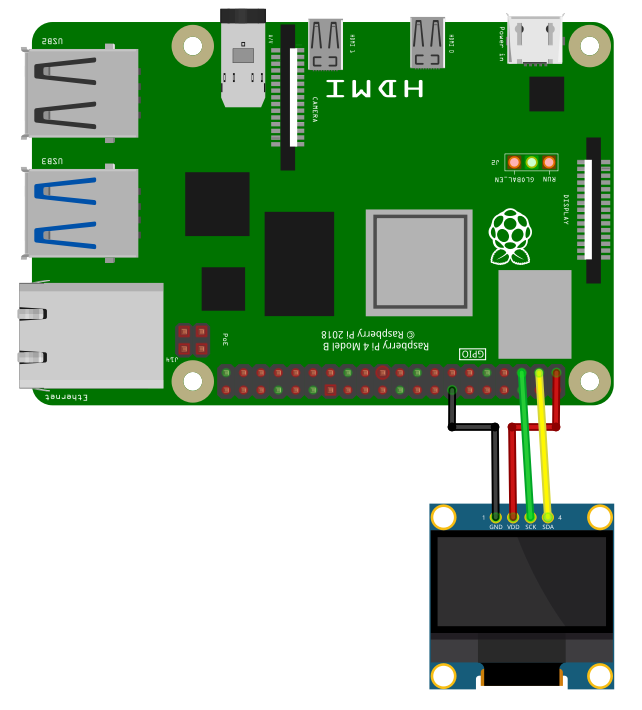
In the next step please wire the display as shown in the following image.
The I2C bus is using pin 2 (SDA1) and 3 (SCL1). Please be careful, these OLEDs are usually driven with 3.3V. Don’t connect to 5V unless you know what you are doing.
import ssd1306

const ADDRESS = 0x3C
const WIDTH   = 128
const HEIGHT  = 64

Print "Connect to SSD1306 OLED display"
ssd1306.Open("/dev/i2c-1", ADDRESS)
Print "Connection established"

delay(2000)
ssd1306.Cls()
ssd1306.Circle(25, 40, 16, 1, true)
ssd1306.At(50,5): ssd1306.Print("I2C with", 1)
ssd1306.At(50,14): ssd1306.Print("SMALLBASIC", 1)
ssd1306.line(0, 0, 127, 63)
ssd1306.rect(0,0,127,63)

' Transfer framebuffer to display
s = ticks
ssd1306.Display()
print ticks - s
delay(2000)

' Set brightness
ssd1306.SetBrightness(20)
delay(1000)
ssd1306.SetBrightness(255)
delay(1000)

' Display on/off
ssd1306.DisplayOff()
delay(1000)
ssd1306.DisplayOn()
delay(1000)

' Set inverse
ssd1306.InvertDisplay()
delay(1000)
ssd1306.InvertDisplay()

print "done"import ssd1306
ssd1306.Open("/dev/i2c-1")
delay(1000)
ssd1306.SetBrightness(128)
ssd1306.Cls()
ssd1306.Pset(10,0)
ssd1306.Line(0,0,127,63)
ssd1306.RoundRect(58,26,40,20,5)
ssd1306.Circle(118,10,5,1,1) 'Filled with white
ssd1306.Triangle(118,30, 113,45, 123,45, 1, 1) 'Filled with white
ssd1306.At(0,46)
ssd1306.SetTextSize(16)
ssd1306.Print("SmallBASIC")
ssd1306.Display()
'Let's move a image of a smiley with transparency over the screen
'Create an image array with 16x16 Pixels
dim SmilyGuyArray(15,15)
for yy = 0 to 15
for xx = 0 to 15
read d
SmilyGuyArray(xx,yy) = d
next
next
dim Background
for xx = 1 to 127
' Save the part of the OLED display, where we want to draw the smiley.
Background = ssd1306.GetArray(xx, 25, 16, 16)
' Copy the array to the display:
' Mode = 3 -> Pixel value: 0=Black;
' 255=White; Every other number is
' rendered transparent
ssd1306.SetArray(SmilyGuyArray, xx, 25, 3)
ssd1306.Display()
' Copy the saved background back to the display. This will remove the
' smiley. In the next iteration of the loop, you have the original
' background image.
ssd1306.SetArray(Background, xx, 25)
next
delay(2000)
ssd1306.Close()
print("Done")
'Smiley Guy
'0=Black; 255=White; Every other number is transparent
DATA 1, 1, 1,255,255,255,255,255,255,255,255,255,255, 1, 1, 1
DATA 1, 1,255,255,255,255,255,255,255,255,255,255,255,255, 1, 1
DATA 1, 1,255,255,255,255,255,255,255,255,255,255,255,255, 1, 1
DATA 1, 1,255,255, 0, 0, 0, 0, 0, 0, 0, 0,255,255, 1, 1
DATA 1, 1,255, 0,255,255,255, 0, 0,255,255,255, 0,255, 1, 1
DATA 1,255, 0, 0, 0, 0, 0, 0, 0, 0, 0, 0, 0 ,0 ,255,1
DATA 255,255, 0, 0,255,255, 0, 0, 0, 0,255,255, 0, 0,255,255
DATA 255,255, 0, 0,255,255, 0,255, 0, 0,255,255, 0, 0,255,255
DATA 255,255, 0, 0, 0, 0, 0,255,255, 0, 0, 0, 0, 0,255,255
DATA 1,255, 0, 0, 0, 0, 0, 0, 0, 0, 0, 0, 0, 0,255, 1
DATA 1,255, 0, 0,255, 0, 0, 0, 0, 0, 0,255, 0, 0,255, 1
DATA 1, 1,255, 0, 0,255, 0, 0, 0, 0,255, 0, 0,255, 1, 1
DATA 1, 1,255, 0, 0, 0,255,255,255,255, 0, 0, 0,255, 1, 1
DATA 1, 1, 1,255, 0, 0, 0, 0, 0, 0, 0, 0,255, 1, 1, 1
DATA 1, 1, 1, 1,255,255,255,255,255,255,255,255, 1, 1, 1, 1
DATA 1, 1, 1, 1, 1,255,255,255,255,255,255, 1, 1, 1, 1, 1import ssd1306
ssd1306.Open("/dev/i2c-1", 0x3C, 128, 32)
delay(1000)
ssd1306.SetBrightness(128)
ssd1306.Cls()
ssd1306.Pset(10,0)
ssd1306.Line(0,0,127,31)
ssd1306.RoundRect(58,5,40,20,5)
ssd1306.Circle(118,10,5,1,1) 'Filled with white
ssd1306.At(0,46)
ssd1306.SetTextSize(16)
ssd1306.Print("SmallBASIC")
ssd1306.Display()
delay(2000)
ssd1306.Close()
print("Done")